We’ve been getting quite a lot of questions about the difference between Sensor frames per second and Project frames per second, and how to choose the right settings for your workflow. In this article we’ll answer all those questions, and we’ll show you how to fix any problems.
In Short
What is Sensor FPS?
The sensor fps parameter specifies how many frames are being captured per second.
What is Project FPS?
The project fps parameter specifies at what speed the captured frames are being played back, often called: Frame Rate.
‘Sensor FPS’ and ‘Project FPS’ are two parameters that jointly determine how time is being expressed. Once a video is captured the sensor FPS parameter is irrevocable, contrary to the project fps which is only metadata.
Most cinematographers will set their project FPS to 24 and thus have to set their sensor FPS to 24 in order to display time ‘normally’.
Project fps is a value that should be fixed during the shoot of a project and is set according to the Frame rate a project is finished (edited) in.
Different settings explained
- If sensor FPS and project FPS are set to the same value than time is being displayed the same as how time appeared in real life.
- If sensor FPS is set to a higher value than the project FPS; than the video will be displayed in ‘Slow Motion’.
- If the the sensor FPS is set to a lower value than the project FPS; than time will be displayed in ‘Quickmotion’.
How to adjust project FPS after shooting
Project FPS can be revoked during post production, and sensor fps is irrevocable, but that said: we can do a reinterpretation afterwards of the frame rate (projects FPS). In this example we’ll show how to adjust our project FPS afterwards, working with premiere pro.
Let’s say we forgot to set our project FPS, and the project FPS was on the default value which is 25FPS. And during the shooting our sensor FPS was set to 24FPS. If we now look at our video files they appear in ‘quickmo’ and thus time is being displayed at a faster pace than it appeared to us in real life. In this case 4% faster.
If we want to get our files being played back in ‘normal’ time: all we have to do is to match up our project FPS with the sensor FPS.
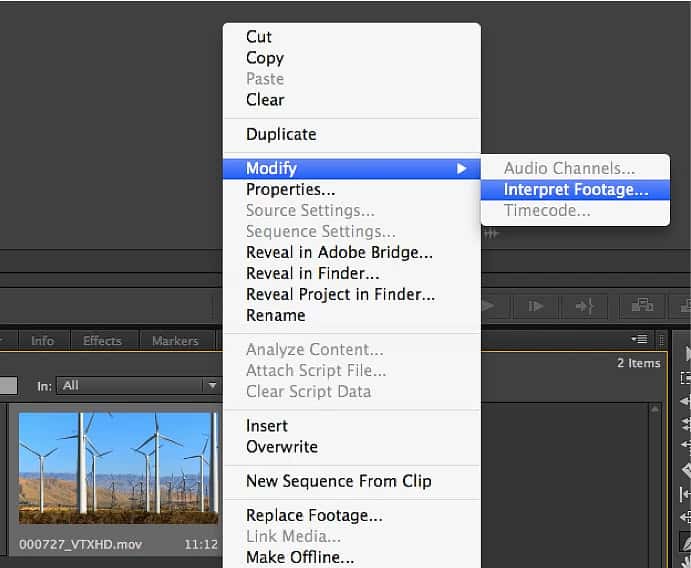
In premiere we right-click on the affected clip in the Project window, hit Modify > Interpret Footage. Once the setting box opens, click “Frame Rate” and choose “Assume this Frame Rate”. Then change the Frame Rate to 24. Now your clip should fit into a 24p sequence and time will be displayed like how it appeared in real life.
For more information about Interpreting Footage, see this video tutorial from Learn by Video and video2Brain by Maxim Jago.
Please note that any professional NLE has the ability to change the frame rate of a video file. If you don’t remember at what sensor fps the video file was captured than refer to the slate files inside kinefinities video folders

How to Batch Process and retime a complete video folder
In case you’ve shot a full project in let’s say 50fps, in order to cut out some slowmotion out of your footage. An you want to have the majority of your footage to be played back in normal time in a 25fps sequence, we’ve made this tutorial for Premiere Pro.


