Dynamic Range Primer is an evolving ‘write to think’ essay, which will continually expand and delve into the technical and artistic aspects of Dynamic Range in cinematography.
Methods of Understanding Dynamic Range
Dynamic Range can be approached from a scientific perspective, emphasizing electronics, or through empirical methods. This includes conducting latitude tests, shooting charts, and utilizing software like IMAtest to quantify dynamic range, moving beyond mere perceptual observations.
Alternatively, a scene-reference-based study of Dynamic Range focuses on what is presented before the camera, and how many stops of light are retained in a film’s final master. By employing a spot light meter to measure the real-world scenes captured by the camera, and analyzing the contrast light ratios used in renowned films, cinematographers can discern the necessary dynamic range for capturing scenes with sufficient data for effective post-production and maximizing visual intent.
This ongoing article aims to explore Dynamic Range from both artistic and technical perspectives, acknowledging the significant crossover between these two realms.
Technical Explanation of Dynamic Range
To begin, it’s crucial to align on the definition of Dynamic Range. Simply put, it’s the range of light intensities (stops of light) a camera can capture. However, this definition is somewhat reductive as it doesn’t account for the quality of the captured range. History has shown that mere numerical values can lead to misconceptions and misuse, particularly in camera marketing.
Three Ways Cameras Can Misrepresent Dynamic Range in Tests
- Reflective Sensor and Cabinet Design: A camera with a reflective sensor and cabinet can scatter light internally, reducing contrast and artificially inflating dynamic range in technical tests. This can also occur with lenses that poorly retain contrast. Although this might initially seem like a higher dynamic range, the detail in the lowest patches often lacks separation, leading only to a loss in contrast.
- Highlight Construction in RAW Processing: Some cameras use highlight construction algorithms that can’t be bypassed, even in RAW processing. This method involves extracting extra highlight details at the expense of color accuracy. While these algorithms can be sophisticated, they often yield disappointing results, especially in cameras that bake in highlight retention (like RED cameras). Such alterations can distort true dynamic range values.
- In-Camera Noise Reduction: Certain cameras, like Sony’s prosumer line, do not allow complete disabling of internal noise reduction. This process can obliterate fine details, falsely suggesting a higher dynamic range on a macro scale but failing at finer levels.
ARRI Alexa
At Gafpa Gear, we recognize the ARRI Alexa35, launched in 2022, as the top contender in terms of Latitude/Dynamic Range capabilities, with 15.3 stops of light at a setting of 2SNR (benchmark).
Following closely in second place is the venerable ARRI Alexa Classic, sharing the same photosite design as the Alexa LF and Alexa 65. The Alexa Classic boasts an impressive 13.5 stops of dynamic range at a pixel-to-pixel level. This can be effectively enhanced to 14 stops when oversampled by 70% down to 2K resolution.
The ALEXA classic cameras were engineered to automatically oversample by a factor of 0.7X when recording in Prores. This technique is crucial for surpassing the Nyquist limit, thereby achieving the true perceptual resolution of 2K that the camera can resolve. This oversampling is particularly beneficial for Bayer sensors, a standard in the industry, to overcome their innate challenge in differentiating contrast and detail (as measured by the modulation transfer function, or MTF).
Through oversampling, the dynamic range of the image is not significantly altered in terms of measurable stops; however, it does lead to a visibly cleaner image, especially in shadow areas, and reduces color pollution due to lower chromatic aberrations. Consequently, even though the dynamic range is quantitatively rated at 14 stops when oversampled and 13.5 stops in a pixel-to-pixel comparison, both settings yield comparable dynamic range values. The key difference lies in the noise level, with the oversampled image presenting a noticeably cleaner and more refined visual quality.
Latitude
The concept of LATITUDE could be introduced as a measure of the perceptual quality of an image. This is typically evaluated by intentionally underexposing an image and then restoring it to a normal exposure level during post-production. The shadow quality, as a crucial aspect of latitude, can be described in three primary ways:
- Linear performance, indicating good contrast separation.
- The amount and character of noise. Various noise types, like sensor noise and Analog-to-Digital Converter (ADC) noise, can combine unfavorably, potentially leading to undesirable patterns such as fixed pattern noise. Additionally, codecs can further complicate the noise characteristics.
- The presence of general color shifts, loss of color information, or distortion of color information.
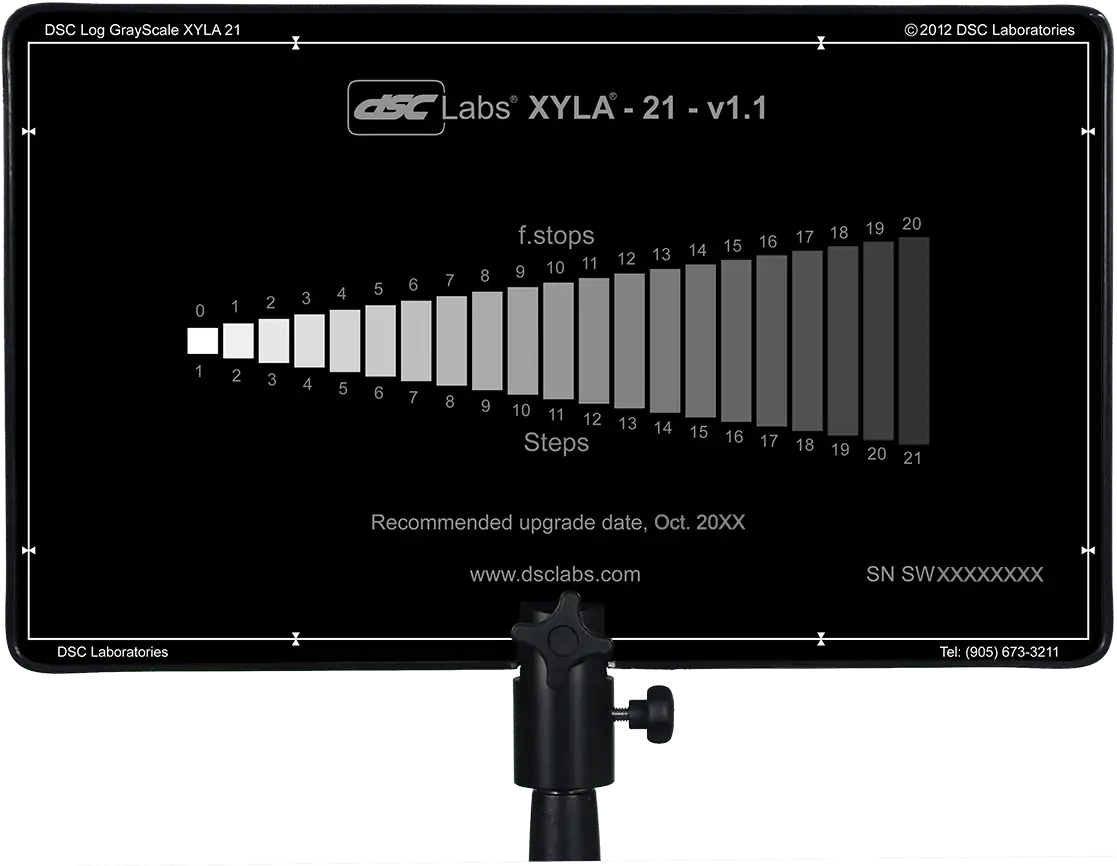
Dynamic range is commonly assessed using the sophisticated software IMAtest in conjunction with the high-quality XYLA chart. To conduct this test, a camera with a lens capable of accurate contrast reproduction is pointed at the chart. Each patch on the XYLA chart represents a stop of light. The chart is back-illuminated and features patches with filtration filters, providing scientifically accurate stops of light without color pollution – akin to ND filters.
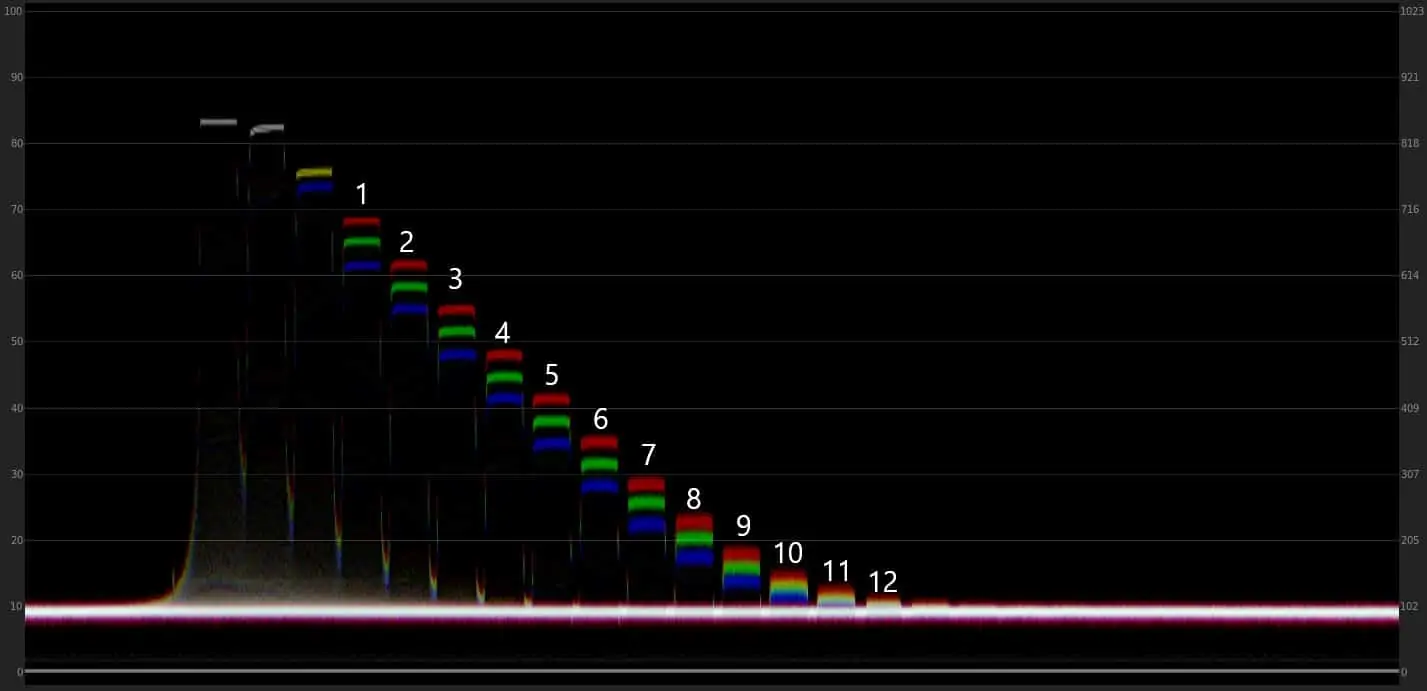
In IMAtest, the footage is linearized through a smart data fit or by manually applying gamma data. The resulting curve, noise pattern, and RGB data collectively articulate the nuanced challenges of dynamic range measurement. A well-designed camera that avoids internal noise reduction, boasts a high MTF (modulation transfer function for contrast and detail separation), has an anti-reflective lens coating, and refrains from internal highlight reconstruction, can more accurately capture light dynamics.
CINED’s Camera Tests
CINED has begun publishing tests of various cameras and building an archive. Although their efforts are commendable, there are several issues with their methodology. For instance, the RED KOMODO, which we rate at 10.8 stops of dynamic range, demonstrates fake highlight stops.
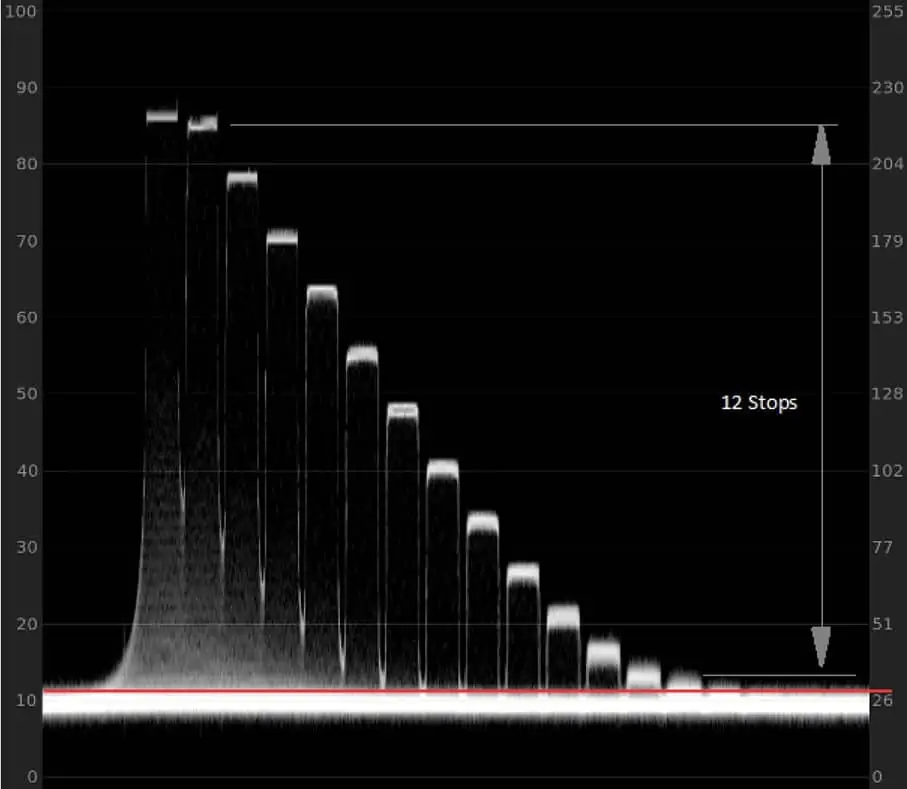
Most cameras tested by CINED have a 12-bit readout and technically should not exceed 12 stops of light. Values above 12 often indicate issues like reflections, inappropriate shadow handling, or artificial enhancement through highlight reconstruction. This doesn’t necessarily signify a high dynamic range but rather a misrepresentation of the light received by the camera. Such cameras typically exhibit a steep decline in linearity toward the shadows, making closely spaced Xyla patches appear almost identical in IRE levels, similar to the effect of a low-con Tiffen filter.
We suggest that CINED categorizes cameras into four groups based on their technology:
- Cameras with Dual Gain Readout.
- Cameras with 14-bit ADC.
- Cameras with 12-bit ADC.
- Cameras employing other methods, like Quad Bayer.
These categories reflect the main technologies in cameras and can predict dynamic range outcomes based on hardware capabilities. A 12-bit ADC camera, for instance, cannot realistically capture more than 12 stops of light, and a 14-bit ADC camera is limited to 14 stops.
Dual Gain Readout (DGO) functions differently. A pixel can either be fed to two separate ADCs with different gains simultaneously or being read out twice in a row. DGO sensors can potentially offer higher dynamic ranges, depending on photosite quality.
The amount of noise generated by a pixel before reaching the ADC is crucial. Excessive noise pre-ADC limits the additional stops of light that can be captured. Larger pixels generally produce less noise due to better light gathering, but this is a complex issue depending on sensor layout and other noise-generating hardware components.
A higher ADC bit depth is beneficial as it can capture more nuanced noise patterns, leading to a nicer image. However, this often results in slower readout times, increasing rolling shutter effects.
Cameras like the Fujifilm XH2s with its stacked sensor design demonstrate that rolling shutter artifacts can be effectively managed. Additionally, almost all RAW-shooting cameras don’t apply noise reduction at the RAW level. Tests have shown the benefits of pre-debayer noise reduction for improved color accuracy and more organic noise characteristics. We hope more camera brands will adopt pre-debayer noise reduction techniques in the future.
12 bit adc
A significant number of professional cameras priced above 1500 euros are equipped with sensors that, in video mode, are limited to a 12-bit Analog-to-Digital Converter (ADC). Even more concerning is that many cameras still in production are restricted to an 11-bit readout, effectively capping their dynamic range at 11 stops. These limitations are prevalent in about 80% of pro cameras in this price range.
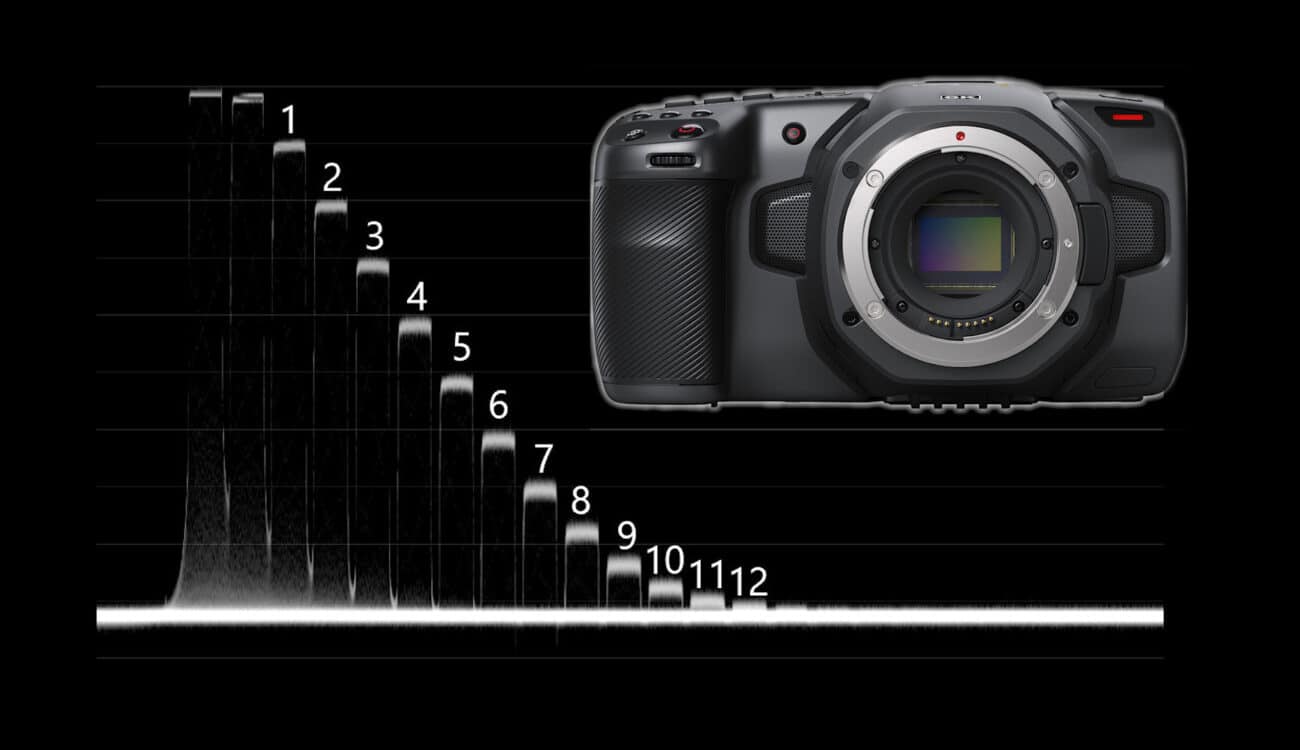
The variation in dynamic range among these cameras can be attributed to factors like internal noise reduction techniques or the quality of the photosites on the sensor. However, these differences are often marginal. For instance, a camera like the Pocket 6K recording more than 12 stops is usually a result of light scattering within its less sophisticated sensor housing. This phenomenon can mimic the effect of using a soft contrast lens or a lens with a soft contrast filter on a high dynamic range camera like the ARRI Alexa. However, it’s important to note that this does not equate to a genuine increase in dynamic range as measured by tools like the IMAtest.
The quality of both the sensor and its ADC plays a crucial role in dynamic range capture. Consider a high-quality sensor with excellent signal-to-noise specifications operating in a 12-bit ADC mode. In this scenario, you could potentially capture 12 stops of light as usable dynamic range. When the readout mode is switched to a 14-bit ADC, theoretically, you gain two additional stops in the shadows. However, the highlight clipping point remains unchanged due to the well capacity of the sensor.
This highlights the importance of understanding the inherent limitations and capabilities of a camera’s sensor and ADC, especially when assessing its performance in terms of dynamic range and overall image quality.
Visual Information Analysis Using XYLA Charts
In our approach, we prioritize the visual information revealed by a XYLA chart after linearizing the data. Most cameras record in a logarithmic format to efficiently pack a higher bit depth into a lower bit depth container. This is evident in our analysis of cameras like the Pocket 6K. By examining the chart, we can distinctly observe the noise generated by both the Analog-to-Digital Converter (ADC) and the pixels themselves. Crucially, once the signal intersects with the ADC noise threshold, the capture of usable visual information ceases. Although some visual data might be recoverable from this noise, its quality is generally too compromised to be of practical use.
This understanding shifts our focus from mere numerical values to a more nuanced assessment. We count the stops of dynamic range above the noise floor and consider the linear response post-linearization. Non-linearity can indicate issues such as light scattering within the sensor housing or the use of an unsuitable lens during testing.
When comparing cameras with a 12-bit ADC, we find that their performance is fairly similar, with variations stemming from factors like Color Filter Array (CFA) quality, color science (including color correction matrix or huesatdim mapping), codecs, sensor housing, and Optical Low Pass Filters (OLPFs). However, it’s important to clarify that Modulation Transfer Function (MTF) and spectral sensitivity, while crucial, are separate from the dynamic range discussion and will be addressed in different topics.
In the industry, almost every camera performs a 12-bit readout, with notable exceptions like the Canon C70 and C300 (both featuring Dual Gain Output), ARRI Alexa and Alexa35, Panasonic Varicam, Fujifilm XH2S, and certain Sony models. Others, including Zcam, Kinefinity, and most Sony cameras (except the Venice), typically utilize a 12/11-bit ADC. The RED Komodo also falls into this category, and some tests suggest it might even be limited to an 11-bit readout. Their marketing notwithstanding, if you believe that cameras like the Komodo or Sony FX6 deliver more than 11.8 stops of real dynamic range, then this analysis may challenge your perspective.
Latitude test to determine Dynamic range
Addressing the issue of dynamic range quantification, we advocate for a practical approach to measuring it. Here’s a refined explanation of the proposed latitude test:
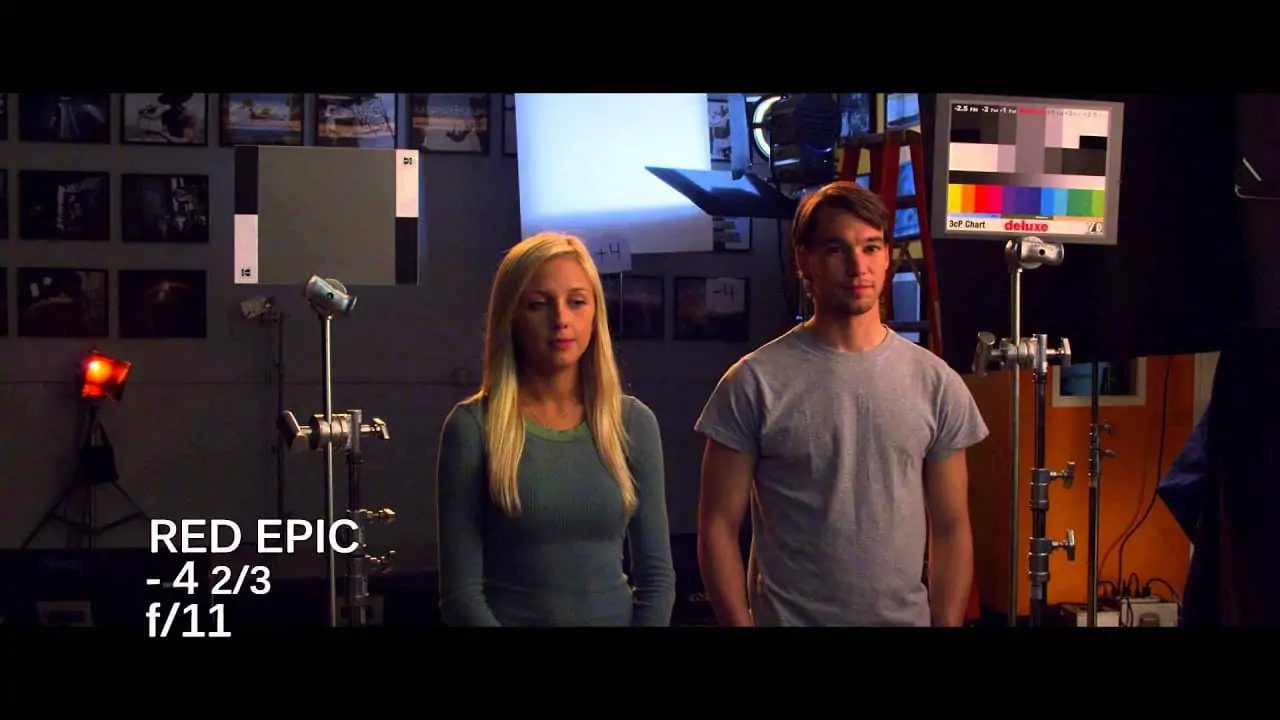
- Test Setup: Utilize a grey or white chart in your frame, alongside a real-life subject, to provide context. Initially, overexpose the chart, then systematically reduce exposure by one stop at a time. Adjusting shutter speed is the most effective method for this.
- Processing the Test Footage: Import the footage into DaVinci Resolve. Start with the first unclipped shot. To be cautious, you might select the shot one stop lower to avoid any color clipping. Linearize this shot using the appropriate log data for your camera on the first node. Then, normalize the image to look ‘normal’ using the gain slider on the second node, and convert it to Rec.709 gamma 2.4 on the third node.
- Comparing Exposures: Use the gain slider to match the exposure level of the white/grey chart across all shots to your reference image. This process helps in evaluating the decreasing exposure levels. While lower exposures will introduce more noise, we can overlook this aspect for the purpose of this test.
- Evaluating the Results: Monitor the contrast and color shifts on your scopes. Once you observe significant changes, terminate the test and count the stops up to this point. This simplified approach is effective, yet there’s a noticeable gap in Cined’s tests, particularly in their handling of linearization to adjust exposure. Accurate linearization could significantly enhance the relevance of these tests.
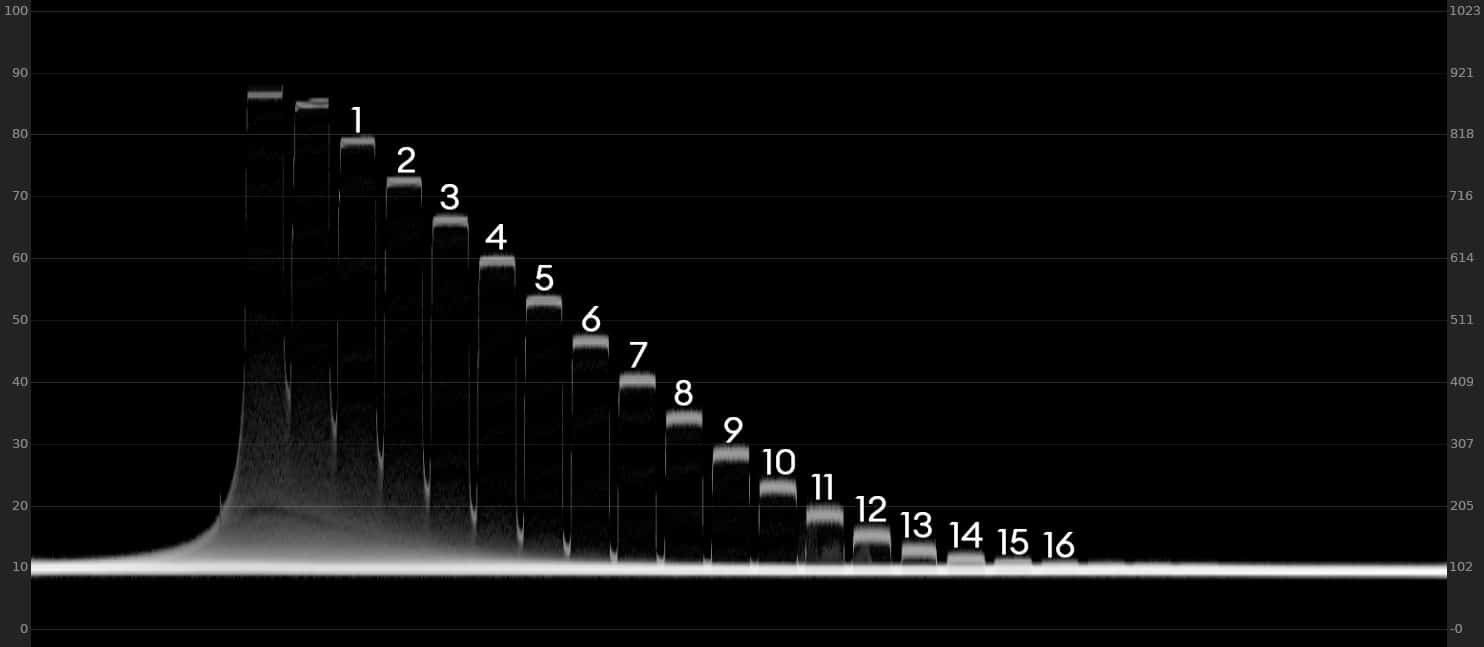
Digital Sensor vs. Analogue Film: Unlike analogue film, a digital sensor is inherently linear. Any deviations from linearity are usually due to sensor malfunction or manufacturer-applied huesatdimmap adjustments. For example, examining a Xyla chart waveform of the ALEXA35 in LogC4 reveals that linearizing these stops results in a straight line. This demonstrates that a log curve is not representative of digital sensitometry. Therefore, for lab tests, a linear display is essential as it allows for straightforward latitude assessment without intricate testing.
Practical Implications: In a test using the Alexa35, you’d find that even the 16th stop doesn’t reach the noise floor. However, due to the steep nature of the LogC4 curve, stops like 16, 15, and 14 appear unusable in the image above. Once linearized, it becomes apparent that there are even discernible details in the 17th and 18th stops, albeit embedded in the noise floor, which can provide a natural roll-off effect towards the shadows, towards complete random noise.
HUESATDIM map on ARRI Alexa
The huesatdim map implemented in Alexa cameras can complicate post-production processes, as reversing its effects is a challenging task. Alexa’s color science is akin to a hybrid subtractive approach, essentially a 3D non-linear LUT layered over a color correction linear matrix (CCM). This complexity sometimes leads professionals to prefer cameras like the Venice for their more ‘digital’ color rendition. In our experience, matching a Venice to an Alexa’s color profile is more straightforward than doing the reverse. The reason lies in Alexa’s tendency to roll off and desaturate colors at certain levels.
The capability to disable the huesatdim map in post-production would be a significant enhancement for advanced color grading. Currently, the ‘Alexa look’ forms the baseline for colorists, which is nearly impossible to fully reverse. This is evident in latitude tests, where the cameras exhibit desaturation and contrast shifts not due to poor quality, but because of their non-linear processing.
A decade ago, such a feature was innovative and useful, considering the limited accessibility to advanced grading tools. However, as grading has become more democratized and accessible, the necessity of an embedded 3D LUT in the camera is debatable.
Shooting in ARRI raw still subjects you to the huesatdim map through their UI, and while aesthetically pleasing, the inability to reverse or bypass it is a limitation. Although Arri’s color science might be perceived as organic or unique, it is technically a combination of a well-designed Color Filter Array (CFA), Dual Gain Output (DGO) architecture, among others. The process involves high-level Debayering, applying an XYZ parameter for white balance within the spectral locus, and adding a CCM targeting the ALEXA color space. The quality of the CCM is dependent on the CFA and the Debayer process.
The huesatdim map, in our opinion, is superfluous and could be better utilized as part of their Rec709 display LUT, leaving their LogC3 and LogC4 untainted. This would facilitate proper linearization and transformative grading. Arri has previously disabled their ‘film matrix’ in earlier models; a similar approach to the huesatdim map would be welcomed. By focusing on an effective CCM and continuous sensor design improvements, Arri could enhance its user experience significantly. The film and digital imaging industry, while sometimes slow to adapt, is ready for more transparent and flexible color science approaches.
DYNAMIC RANGE ARTISTICALLY
This topic is particularly intriguing because there’s a common misconception about dynamic range in the context of both its technicalities and its artistic implications.
Firstly, it’s essential to recognize that most cameras capture around 12 stops of light, with some exceptions. However, the artistic usage of dynamic range goes beyond mere numbers. Artistry involves understanding how to create visually compelling images with cameras that have varying dynamic ranges and determining the necessary dynamic range for our artistic vision.
Artistically understanding dynamic range requires us to delve into the concept of mastering. In standard cinema and TV formats, excluding HDR, the display is limited to about 6 stops of light. Our eyes are more sensitive to mid-tones, which allows us to compress more stops into this 6-stop display range using curves. This technique requires a strategic roll-off in highlights and shadows to emphasize the most crucial parts of our compositions.
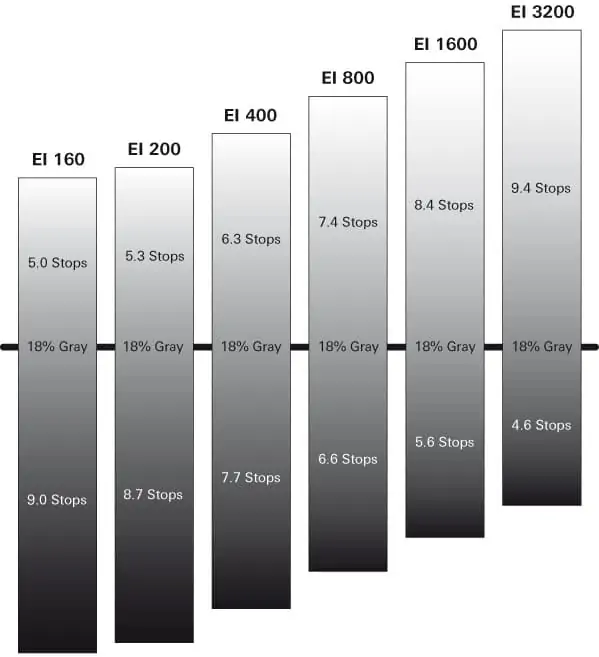
Consider the ARRI ALEXA’s ALEV III sensor, which boasts a usable dynamic range of 14 stops. In CINE EI mode, regardless of the ISO setting, the dynamic range and full-well capacity (the point where highlights clip) remain consistent, meaning no analog gain, only digital. For instance, at 800 ISO, it captures 7.4 stops above middle gray and 6.6 stops below. If we are shooting a scene with a 14-stop dynamic range and want to display it on a standard Rec709 or cinema screen, a significant curve must be applied. This approach is reminiscent of the inherent curve of analog film, deeply embedded in our visual culture.
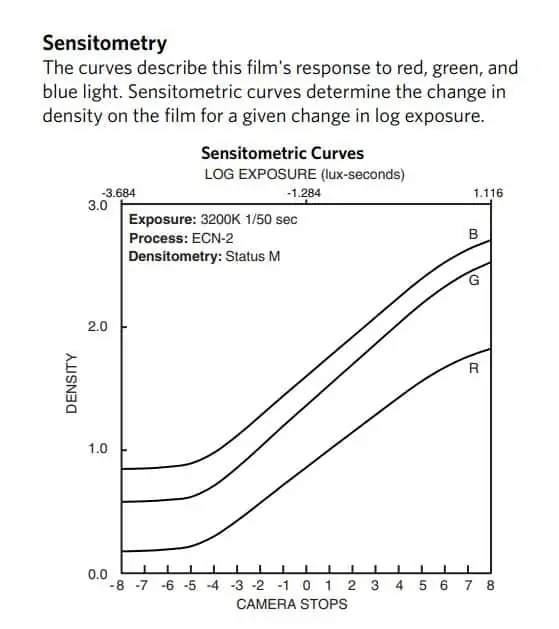
Grading involves aligning critical information linearly and rolling off the remaining stops to avoid harsh clipping in shadows or highlights. For example, Kodak’s 200T Vision 3 film resolves about 10 stops linearly, but at the extremes, contrast decreases and grain increases, indicative of an analog roll-off.
The digital realm presents different challenges, particularly the ‘brick wall’ effect in highlights. In digital sensors, natural roll-off doesn’t exist; it must be achieved through post-production curve adjustments. However, as long as there’s no hard clipping, a roll-off curve can be applied without losing highlight details.
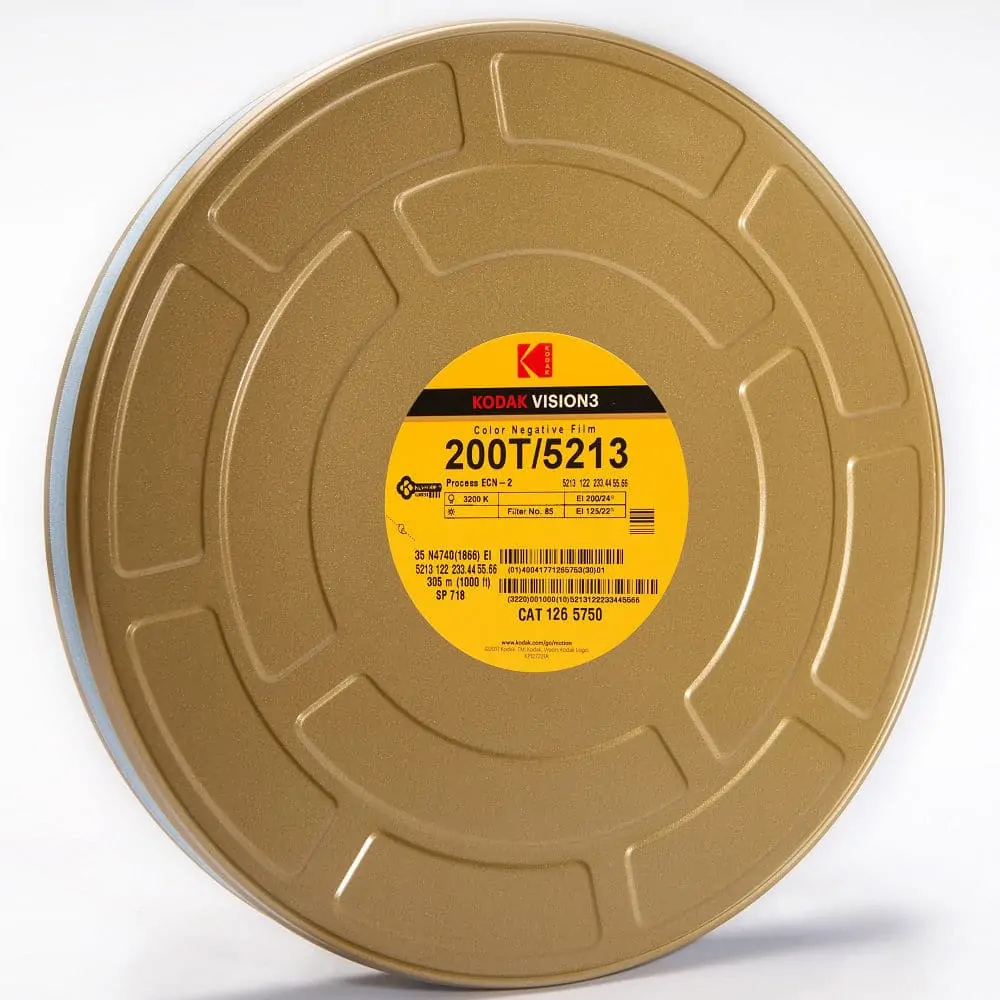
Film has always had a wide dynamic range with a smooth transition to white. Cinematographers often rated their films at a lower ASA to enhance shadow detail and reduce grain. For example, 500T film was commonly rated at 320 ASA. With digital, avoiding white clipping is essential. Techniques such as halation/blooming filters, vintage lenses, and adding grain in post-production can soften the appearance of clipped whites.
In digital cinematography, avoiding clipped highlights might involve underexposure or using high dynamic range cameras like the ALEXA ALEV III or ALEXA35. But remember, film has an extensive roll-off towards white. Overexposing film has limitations: highlights lose density and color information and look best when applied to non-critical elements.
Comparing the filmic response to the ALEXA35, it’s clear that modern digital cameras can replicate film-like curves. The ALEXA35, for instance, allows for a 5-stop extreme roll-off curve while maintaining enough linear stops for a detailed image, even in complex lighting. This capability highlights the advancements in digital cinematography, offering both a nod to traditional film aesthetics and new realms of creative possibilities.
Spotmeter your way through life
Perhaps this should have been the starting paragraph of our article, as it is essential for understanding dynamic range both artistically and technically. As photographers or filmmakers, we engage with reality not just as it is, but as we transform it through our vision. In this transformation, there’s no absolute right or wrong, as long as there’s a clear vision guiding the process.
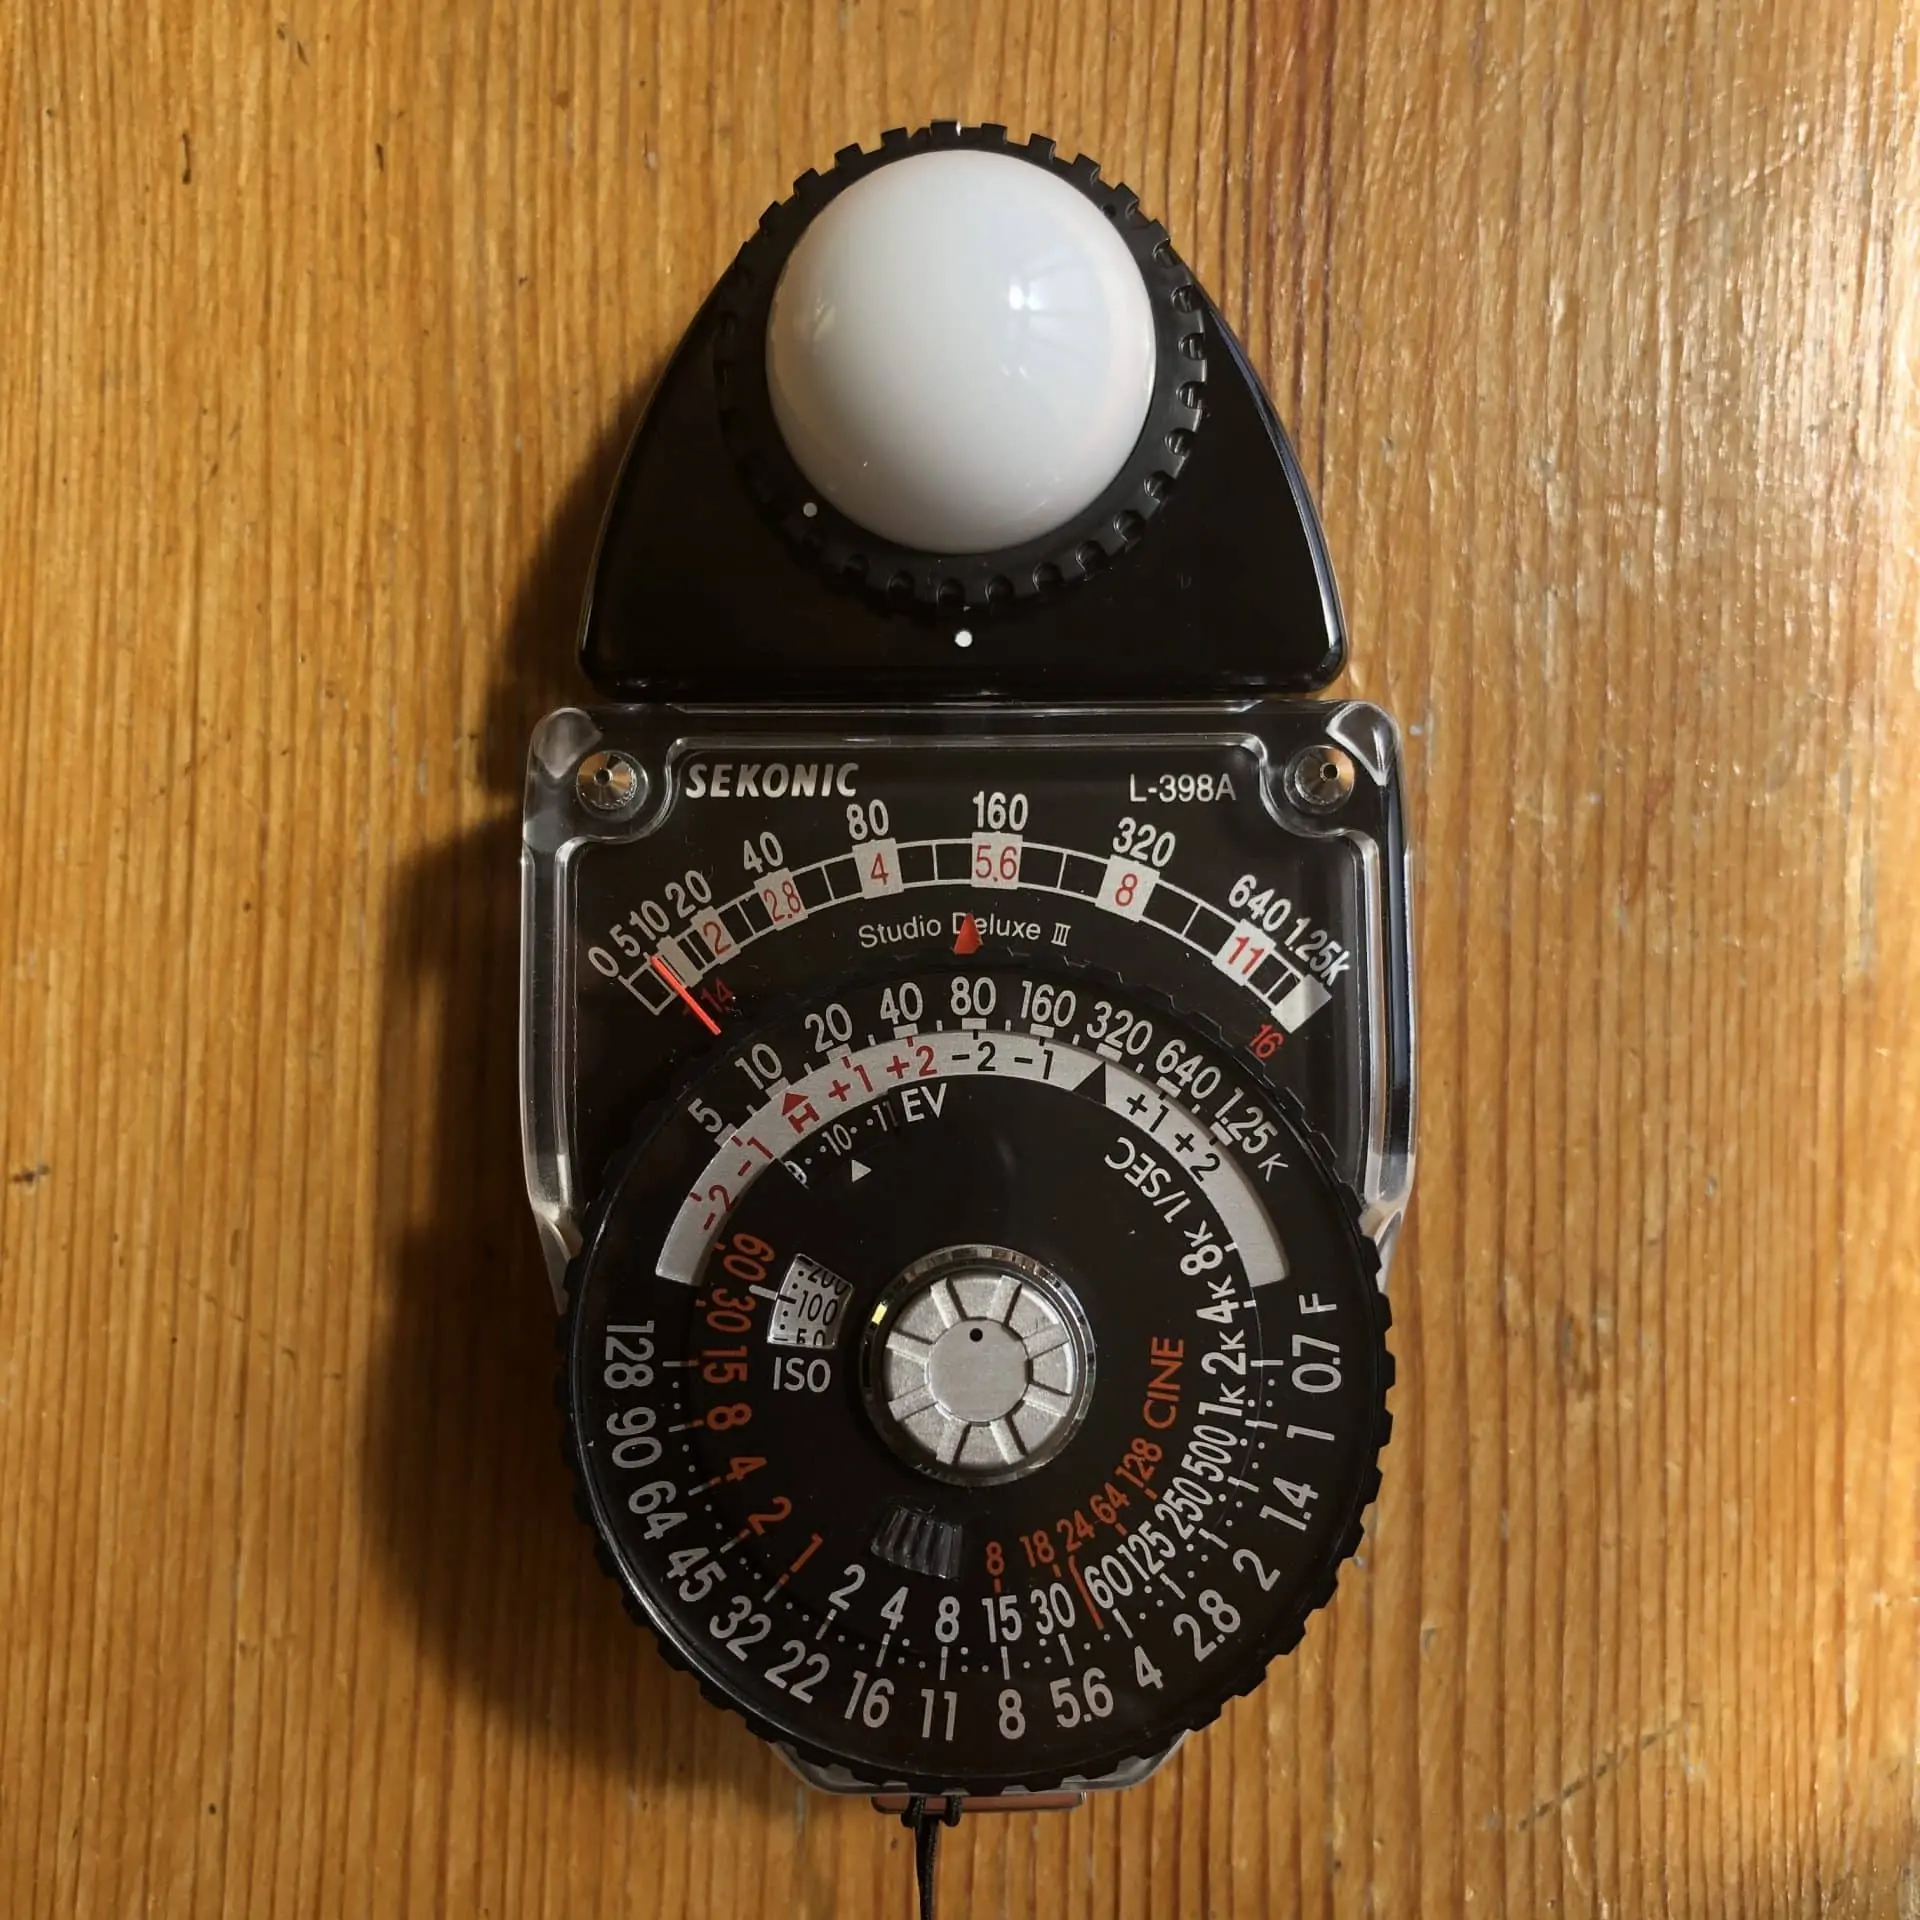
We challenge every cinematographer and filmmaker to get a spotmeter. It doesn’t have to be an expensive one. In fact, a model with an incidental meter (the cone) isn’t necessary and might even be misleading. Just start with a basic spotmeter. You’ll be amazed at the wealth of information it provides. A spotmeter usually comes with a small zoom lens. All you do is point it at an object or surface, and it tells you the f/t stop, shutter speed, ND value, or ISO speed needed to render that object or surface as 19% middle gray.

Those who have shot with an analog still camera, which often has a primitive built-in spotmeter, will understand its problematic nature.
Here’s an example: Imagine being on a winter sports trip (hard to imagine with climate change) and wanting to photograph a friend skiing. You aim your spotmeter at the fresh snow, and it advises shooting at F22. You set your lens accordingly, but when you develop the film, the snow, which was bright white in reality, is rendered as mid-gray, and your friend appears as a silhouette.
The solution involves understanding how bright you want to render the snow – in this case, about 4 stops above middle gray. So, you should open your lens to around F5.6. However, upon developing the film, you might find that while the snow is nicely rendered, your friend’s face is still somewhat dark and grainy. If you meter the face, it might suggest shooting at F4.0, but knowing that pale skin tones should be rendered at least one stop above middle gray, you adjust to F2.8.
Upon development, you may still struggle to find a good balance: now the face looks great, but parts of the sky and snow slope are overexposed. The scene itself, even with high dynamic range film, might look unappealing once printed, as prints hold a very limited dynamic range. The lesson here is that even a well-metered and captured scene can fall short if the composition or subject matter is lacking.

The spotmeter teaches you to look more deeply at a composition. It might reveal that your initial idea was generic, the placement of the camera was off, or the entire setup lacked balance. Perhaps the scene wasn’t as visually appealing as you thought, or the lighting conditions weren’t ideal. But in analyzing these aspects, we learn and improve as artists.
This exercise demonstrates that even with proper spotmeter usage and sufficient dynamic range in your film or digital camera, a composition can still fail. By studying and revisiting our compositions, we become better artists. Spotmetering the world helps us understand that many visually appealing scenes have a limited range of real-life stops of light. Mastering the technical capture of these scenes is crucial because cinema is about flattening 3D space and light. We don’t necessarily want to replicate the sun’s brightness or require sunglasses for viewing. While we can compress 16 stops of light into an 8-stop projected image, each stop of light effectively becomes half a stop, potentially reducing contrast.
Before becoming artistic with our approach, we must understand our medium’s limitations. HDR exists, but it’s not yet a standard, and there’s value in a more conservative approach. Consider the art of painting. I once brought my spotmeter to the Rijksmuseum to measure a Rembrandt, known for his contrast-rich paintings. Surprisingly, I found only 6.5 stops of dynamic range. Even with a circular polarizer to reduce reflections, it measured 5.8 stops. This range fits more than twice into an ARRI ALEXA ALEV III sensor’s dynamic range. The painting of Rembrandt doesnt lack contrast instead it’s considered to by ‘life like’.

In conclusion, spotmetering is far more than a technical exercise; it’s an essential part of understanding and manipulating light to bring an artistic vision to life. While cameras like the Alexa offer vast dynamic range, the artistry of photography often requires less, not more. This counterintuitive approach to dynamic range is key to reproducing reality in a compelling way.
The essence of spotmetering lies in its ability to guide us in making intentional choices about light and composition. It teaches us that the impact of an image often comes from restraint and precision. By focusing on just a fraction of a camera’s dynamic range, we can create images that are more compelling.
Ironically, in the quest to capture reality, using the full dynamic range can lead to images that feel flat and lifeless. Over-reliance on technology can diminish the natural contrasts and subtleties that give depth and interest to an image. By using only the necessary dynamic range, we emphasize the elements that truly matter in our composition, creating a stronger, more focused narrative.
Furthermore, the temptation to ‘fix’ everything in post-production, using techniques like power masks, can undermine the authenticity of the moment captured. Spotmetering empowers us to make more informed decisions in-camera, preserving the integrity and intention of our original vision.
In essence, spotmetering is a practice that hones our sensitivity to the nuances of light and shadow, teaching us to create images that resonate with viewers on a deeper level. By understanding and embracing the limitations of dynamic range, we can transform ordinary scenes into extraordinary images.
Shoot in-camera
In wrapping up, our exploration into Rembrandt’s paintings in this Dynamic Range Primer, often hailed for their striking contrast, reveals a surprising truth: they encompass just about 6.5-7 stops of light. This fact is a revelation – even the most modest cameras, such as old Mini DVs with a mere 8 stops of dynamic range, can capture these masterpieces without losing detail in highlights or shadows.
As we conclude, we can’t miss out on an enlightening video featuring the remarkable Geoff Boyle, who delves into the relationship between paintings and cinematography. This exploration is pivotal, underscoring the quintessential role that studying paintings plays for any cinematographer seeking to master the art of visual storytelling. The lessons drawn from the canvas are not just about light and shadow, but about capturing the very essence of a scene – a skill every camera, regardless of its technical capabilities, can achieve with the right artistic vision.
